Wednesday, August 7, 2013
Render & Light Effect Test
Rabbit: Render & Light Effect Test from Alessandra Waste on Vimeo.
Here's another look at my favorite sequence. Rendered it out all pretty with Final Gather and tried out a little glow effect in After Effects to make the cave floor breaking seem a little more Matrix-y, like it's something more tech-related. A friend had a good point, though, that with the glow that thin it could be misconstrued as a shoddy composite job. I'm going to mess around with it a little more. I think I have a few options:
1. Increase the amount of initial glow so there's no question that it's intentional.
2. Get rid of glow entirely and leave black transparent background as-is
3. Duplicate layer in AfterEffects, hide that layer's original composite, and mask around the area where the glow would line the edges of the rabbit while leaving it around the edges of the floor. The environment's geometry is glowing and breaking at this point, not the rabbit, so he shouldn't glow.
Hmm. Back to work, back to work!

Wednesday, July 31, 2013
My bunny broke Maya
Rabbit fall test 2 from Alessandra Waste on Vimeo.
Sorry I've only updated once in the last week. Been busy busy busy, as is to be expected.
Here's the sequence I've been working on the last two days. Most of one, however, was spent trying to figure out how to break the floor. First I tried to run a shatter effect, then have a gravity field just pull the pieces down. It went terribly for numerous reasons. I ended up just breaking up the pieces by hand and keying each individually. The look is a little different, but I've grown to like it. Before I was trying for a natural-looking crumble (and failing miserably). This looks more like the program itself is breaking, which fits in with the theme of the piece, so... great!
Tuesday, July 23, 2013
no sleep for computers
Yesterday I set two computers to render some sequences overnight. When I came in this morning, one was done and one wasn't. I cancelled the unfinished batch and set it up on another computer where it's been going all day so far. I had to redo the whole sequence anyway because the UVs on the ground were messed up for some unknown reason, so I would have had to redo it anyway. Hopefully it'll be done by the time I come in tomorrow...!
Above is the sequence that actually finished rendering. I used mental ray & Preview: Final Gather because it makes the sand and stones look really nice; I just couldn't get it quite right otherwise, also the trees looked off and this softens them a little bit.
When I render individual frames from Maya, the sky appears blue as it does in the program with physical sun and sky. When I batch render, however, it interprets the sky as transparency. At first this irked me, but then I realized I could composite in one of the Joshua Tree sky panoramas that I wanted to use in the first place but looked stretched, pixelated, or a little too Uncanny Valley when I placed it in Maya as an image plane or environment sphere. I think it looks better this way, actually! Unexpected silver lining!
Thursday, July 18, 2013
hopping along
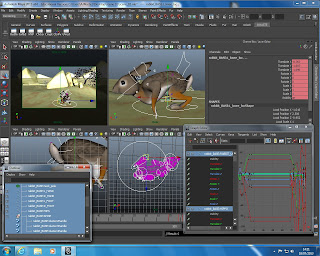
Today is all about animation, much like tomorrow and the next few weeks. Here's a screen grab of all the windows that I juggle while getting this little dude to jump around. He's running off toward the rocks. I'll pop out a playblast at the end of the day since, as we discovered last night, rendering takes so long.

Wednesday, July 17, 2013
Python and Rendering
I set out to play with scripting in Python this morning and explore some possibilities for the cave sequence where reality is revealed to be broken and sort of "Matrix"-like. Unfortunately, it started seeming like a lot of trouble and after a little while I relented. Maybe I'll just do those backgrounds in AfterEffects and then add in the characters when compositing. That could add some interesting layers to the reality of the piece, while also keeping render time down from Maya. Speaking of rendering, I don't have much to show you right now because I've been sitting here for the last two hours waiting for a sequence to render. I wanted to do a 70-frame shot fully rendered out just to see how long it would take. I'm glad I did! Knowing it takes so long to render will definitely help me determine whether or not to do more or less of the cave sequence in AfterEffects and also plan out my final render in a month's time. Hopefully I'll be more able to render scenes as they're completed, leaving them to work overnight and then moving on to the next in the morning. That way I (hopefully) won't get caught out at the end.
Friday, July 12, 2013
save the environments
I kept tweaking the sets today. Here's a render with mental ray and a physical sun and sky.

I tried a few versions first with Image Based Lighting but something just looked... off...
The difference between the photorealistic HDRI behind the almost-sort-of-real-looking rocks was a little too jarring for me. I also tried one with a fixed image plane, but that had the same problem. This was a really pretty landscape I wish had worked:

rabbit in the rocks

Thursday, July 11, 2013

Tuesday, July 9, 2013
problems fixed and snake painted
I had some problems with the rabbit rig yesterday that carried over into today. But I fixed it this morning! Weird things were happening with the combination of the rig, blend shapes, and other cluster deformers. Ended up being a combination of the hip pole vectors going insane (as they do) and one of the clusters on the spline spine whacking out. The pole vectors were straightforward enough to fix once I figured out that they were to blame, but I still don't know what went wrong with the highest spine cluster. I just had to detach the skin, delete history, and reattach it. So now one spine cluster is a little lower than the others, but it still functions the same way and doesn't effect the rig in any noticeable way. After that, the new blend shape I made (for the millionth time) from a newly duplicated skin mesh worked fine.
After giving up yesterday, though, I instead spent time painting the snake and it looks FABULOUS. I think there will be two snake puppets: one for slithering/sidewinding and one for posing and more nuanced movements. The slithering snake uses two nonlinear sine deformers and was surprisingly simple with beautiful results. Right now I'm working on the posing snake. It has a joint skeleton and a retractable mouthpiece with some killer fangs that swing out when the jaw opens.
I'll put up some pictures at the end of the day.
Edit: Look! A picture!
The colors look a little off, but that's just from the default render settings...

After giving up yesterday, though, I instead spent time painting the snake and it looks FABULOUS. I think there will be two snake puppets: one for slithering/sidewinding and one for posing and more nuanced movements. The slithering snake uses two nonlinear sine deformers and was surprisingly simple with beautiful results. Right now I'm working on the posing snake. It has a joint skeleton and a retractable mouthpiece with some killer fangs that swing out when the jaw opens.
I'll put up some pictures at the end of the day.
Edit: Look! A picture!
The colors look a little off, but that's just from the default render settings...

Friday, July 5, 2013
ssssnakes
I thought it would be worth noting in case someone was antsy. NO, THIS IS NOT HOW MY STORY ENDS!:
 Side note, this site is absolutely indispensable when it comes to identifying potential snake or lizard problems in California. We've had our fair share of rattlesnake encounters all up and down the state, though currently my mother is waging war against some particularly territorial western fence lizards in Sonoma. www.californiaherps.com
Here's a really good example of a sidewinding rattlesnake in Arizona. I really like how muscular this snake is. Even though it's moving slowly, you can still see how strong it is.
Decided to go for broke and fully model and rig up the snake. There will be two puppets: one for sidewinding and slithering quickly; one for more articulated poses, strikes, and subtle movements.
Here's a playblast of some quick and exaggerated sidewinding in place. I'm REALLY happy with how this turned out. He still needs his teeth, facial detail, and eyeballs, but I think he still looks pretty menacing anyway! It loops, not sure how to make the player do that automatically...

My rabbit does escape the snake, but we don't really know where he's going instead.
Here's a really good example of a sidewinding rattlesnake in Arizona. I really like how muscular this snake is. Even though it's moving slowly, you can still see how strong it is.
Decided to go for broke and fully model and rig up the snake. There will be two puppets: one for sidewinding and slithering quickly; one for more articulated poses, strikes, and subtle movements.
Here's a playblast of some quick and exaggerated sidewinding in place. I'm REALLY happy with how this turned out. He still needs his teeth, facial detail, and eyeballs, but I think he still looks pretty menacing anyway! It loops, not sure how to make the player do that automatically...
Wednesday, July 3, 2013
Lots of things today
1. I NEED TO DO THIS: http://www.youtube.com/watch?v=XrmDftTd434
The cascade that drops from cyan to red and settles at the bottom is PERFECT for when reality breaks inside the hole/cave/tunnel. Would love to have some sort of "crash" effect, like a computer just gave up. So excited!! I should play with Python more often than I have (which is, like, once...)
2. Animating a run cycle today. So far it's working, I'll pop out a playblast before I leave this afternoon. Hoping to use Clips and the Clip Editor since there running away is definitely an action that will be repeated in this project and animating it again in each sequence could get tedious.
3. Tomorrow is the Fourth of July! Being an American in Scotland, I will make my own holiday, not come into the lab, have corn on the cob and burgers and strawberries and apple pie and sit outside in the park reading my research stuff. YES.
4. Ok, so not actually a lot of things. Eh.
The cascade that drops from cyan to red and settles at the bottom is PERFECT for when reality breaks inside the hole/cave/tunnel. Would love to have some sort of "crash" effect, like a computer just gave up. So excited!! I should play with Python more often than I have (which is, like, once...)
2. Animating a run cycle today. So far it's working, I'll pop out a playblast before I leave this afternoon. Hoping to use Clips and the Clip Editor since there running away is definitely an action that will be repeated in this project and animating it again in each sequence could get tedious.
3. Tomorrow is the Fourth of July! Being an American in Scotland, I will make my own holiday, not come into the lab, have corn on the cob and burgers and strawberries and apple pie and sit outside in the park reading my research stuff. YES.
4. Ok, so not actually a lot of things. Eh.
Tuesday, July 2, 2013
rabbit facepainting
Things I have learned about 3D Paint Tool: it is MAGICAL, as long as you're UVs are pretty. I ended up having to redo the UVs along the spine, they were all stretched out and as a result his back was striped. Looked cool, but not quite what this project calls for, I think...
Here's a preview of how the paint looked at the end of today. And it's actually RENDERED, not just a screencap!! Mmm, mental ray... so shiny and smooth.

Here's a preview of how the paint looked at the end of today. And it's actually RENDERED, not just a screencap!! Mmm, mental ray... so shiny and smooth.

rabbit skin coats

Weeeeeell, while painting the texture file for the unwrapped UVs in Photoshop over the weekend, I remembered something: it's MISERABLE! Especially when I didn't have the model with me to stick in back onto to check progress and that edges match up.
So today, instead of wrestling with that, I decided to try out the 3D Paint Tool. So far it seems alright. I'm not sure if I'm going to give him actual "fur", might just put a teeny bump map with some hatching. Fur would increase render time and might just be a can of worms I don't want to open.
There's a little bit of stretching over his back, I might need to make that a separate piece, I just really don't want to have another UV seam in such a visible place. Might be unavoidable, though, if the texture doesn't turn out perfectly. I should know by the end of the day.
Thursday, June 27, 2013
What a day
Rainy walk over to the lab only to rediscover that there's an all-student meeting this afternoon about planning our graduate degree show and it's over in one of the other buildings. Ugh. Not much time to work over here today so I'm going to block out some of the backgrounds and environmental stuff. Here are some shots from yesterday. I was trying out a pose that the rabbit will end up in pretty often to make sure I had the skin weights alright, especially that his underside didn't fold into itself.


Wednesday, June 26, 2013
Day off & UVs
I took a little break yesterday and didn't come in to the lab. My eyes and brain were fried from solving Monday's problems and I just couldn't bring myself to sit down and deal with unwrapping UVs. Instead, I stayed at home, read some of the research materials for the written component of this project, and saw a movie. Let's call it researching camera moves and angles...
Anyway, this morning I unwrapped and messed around with the rabbit UVs. Think they're all right, I'll throw some color on it this weekend. The checkerboard doesn't seem too stretched out. We'll see.
Did some fine-tuning with the skin weights. Getting there...
Painting weights:

Testing some checkerboard:

UVs:

Anyway, this morning I unwrapped and messed around with the rabbit UVs. Think they're all right, I'll throw some color on it this weekend. The checkerboard doesn't seem too stretched out. We'll see.
Did some fine-tuning with the skin weights. Getting there...
Painting weights:

Testing some checkerboard:

UVs:

Monday, June 24, 2013
spline conundrum -> binding skin
We had some technical difficulties this morning with the spline spine that started a little domino-effect down the hierarchy of controllers and manipulators. I didn't get around to actually binding the skin and starting to paint weights until this afternoon. Here are a few fun poses. Shaping up well!
Bunched up:

Stretched out:

Run away!

Bunched up:

Stretched out:

Run away!

Friday, June 21, 2013
rig-a-rig-a-rabbit
To the tune of Ring Around the Rosie:
Rig a random rabbit;
make naming joints a habit;
if you didn't orient,
they all fall down!
(alternate ending: if you didn't orient... well, you're f*#%d!)

Legs are fine. Arms are fine (fingers to be dealt with later, need be). Tail is fine. Neck is... hopefully fine. Spine is ANNOYING. He's too bendy for his own good. I'm just not super comfortable with spline IK, but it should be alright as long as I deal with the clusters correctly...
I think I'm just going to give the ears a few controllers. Don't want to mess with more splines and clusters, so it'll just be rotating the joints. Eh, should be fine. I wasn't totally sure what to do with the neck, since it's nearly as flexible as the back and needs to be able to puff out when crouched down/bunched up, but also stretch forward and out when running quickly. I added an RPsolver IK as you would ordinarily use in any old character from the neck to the head joint, but I left one more joint between those two so it's more flexible and has a little reactive bend in it. It's all under the head controller circle. Seems OK so far. We'll see...

Rig a random rabbit;
make naming joints a habit;
if you didn't orient,
they all fall down!
(alternate ending: if you didn't orient... well, you're f*#%d!)

Legs are fine. Arms are fine (fingers to be dealt with later, need be). Tail is fine. Neck is... hopefully fine. Spine is ANNOYING. He's too bendy for his own good. I'm just not super comfortable with spline IK, but it should be alright as long as I deal with the clusters correctly...
I think I'm just going to give the ears a few controllers. Don't want to mess with more splines and clusters, so it'll just be rotating the joints. Eh, should be fine. I wasn't totally sure what to do with the neck, since it's nearly as flexible as the back and needs to be able to puff out when crouched down/bunched up, but also stretch forward and out when running quickly. I added an RPsolver IK as you would ordinarily use in any old character from the neck to the head joint, but I left one more joint between those two so it's more flexible and has a little reactive bend in it. It's all under the head controller circle. Seems OK so far. We'll see...

Thursday, June 20, 2013
lagomorphic cleft palate surgery x 3
This morning was rough. I modelled the mouth and ears and tweaked the head a little bit overall. It's a little narrower. Domestic rabbits have wider heads, but desert cottontails are a bit "sportier", though not nearly as lanky as hares. When it came to the mouth I kept adding detail to one side with the knowledge that I would mirror the geometry as a final step. This went fantastically, until I realized that the points on the inside and underside of the lip were so close together that they puckered into one star vertex with a million edges. I ended up doing rabbit "cleft palate surgery" around three times. Finally, I just decided to forget about it, continue modelling, and move on to the ears. Ears then finished, I came back at the end to mirror it all one last time. In the interim I kind of forgot what the inner lip/mouth/nose geometry had originally looked like, so he looks a little now different than intended. It's like rhinoplasty that came out a little too subtle. Something has changed, I just don't know what. Oh well. Here's blockhead:

Here's a smoother version from the front:

And the whole blocky body. Still need to attach the neck. Ho-hum.
EDIT: Connected head to body. There's a seam just at the base of the skull that REALLY bugs me but once I texture him it probably won't show up. I think I've just stared at it for too long. I thought the wireframe from the side looked pretty:


Here's a smoother version from the front:

And the whole blocky body. Still need to attach the neck. Ho-hum.

EDIT: Connected head to body. There's a seam just at the base of the skull that REALLY bugs me but once I texture him it probably won't show up. I think I've just stared at it for too long. I thought the wireframe from the side looked pretty:

Wednesday, June 19, 2013
Mouth Update
I'm trying to work out the mechanics of rabbits' lips when they open and close their mouths. After looking up pictures, I can assuredly say that rabbit mouths are TERRIFYING! They seem very cute and cuddly when closed, but when opened wide the lips SPLIT right up to the nose! It looks like an unmasked Predator! Let's compare:
Cute, unassuming desert cottontail:

Then suddenly.... ROAR!

Predator for comparison:

The lip split under the nose:

"Oh my...."

Cute, unassuming desert cottontail:

Then suddenly.... ROAR!

Predator for comparison:

The lip split under the nose:

"Oh my...."

We Are Already Cyborgs -Jason Silva
We Are Already Cyborgs -Jason Silva
CLICK THAT LINK!! This is exactly my cup of tea. Jason Silva strikes again! Follow him on Twitter. Your brain will be very happy.
I have a bunch to say on this topic since it is close to the core of my written piece. I'll let this simmer in my head on the long walk home.
The mental image when one hears "cyborg" or "augmented reality" is one of robots and high science fiction. Silva does a great job of quickly and simply explaining that technology is an extension of ourselves and technology can be as basic as tool use. Anything we use to supplement the function of our own body is a technological advantage, be it a paintbrush or a haptic glove. The reality is that we are already cyborgs in a sense, just not the ones you might think.
Note to self: look up tools for conviviality. Simplest tools to enhance abilities -> tools for futuring.
CLICK THAT LINK!! This is exactly my cup of tea. Jason Silva strikes again! Follow him on Twitter. Your brain will be very happy.
I have a bunch to say on this topic since it is close to the core of my written piece. I'll let this simmer in my head on the long walk home.
The mental image when one hears "cyborg" or "augmented reality" is one of robots and high science fiction. Silva does a great job of quickly and simply explaining that technology is an extension of ourselves and technology can be as basic as tool use. Anything we use to supplement the function of our own body is a technological advantage, be it a paintbrush or a haptic glove. The reality is that we are already cyborgs in a sense, just not the ones you might think.
Note to self: look up tools for conviviality. Simplest tools to enhance abilities -> tools for futuring.
Digital Digits & Blockhead the Bunny
First thing I did when I came in this morning was copy the whole body, delete the paws, and completely remodel them with actual fingers. MUCH better, I think. The back feet stayed the way they were as one solid piece. I'm ok with that.
He kind of looks cool, actually, down at the unsmoothed poly level. I like his new little blocky toes.
Blocked out (hah) his head. I'm not super confident in modelling eyes and eyelids, but after wresting with it for a little over an hour I think it's passable. I was super careful to avoid vertices with more than 4 edges. No weird pointy or puckered bits allowed! I want to sketch up some mouth ideas and specific shapes/poses before I model the nose/mouth muzzle area. All that's left, then, are some big ears and connecting the head and body.


He kind of looks cool, actually, down at the unsmoothed poly level. I like his new little blocky toes.
Blocked out (hah) his head. I'm not super confident in modelling eyes and eyelids, but after wresting with it for a little over an hour I think it's passable. I was super careful to avoid vertices with more than 4 edges. No weird pointy or puckered bits allowed! I want to sketch up some mouth ideas and specific shapes/poses before I model the nose/mouth muzzle area. All that's left, then, are some big ears and connecting the head and body.


Subscribe to:
Posts (Atom)